So, my younger diva started walking tonight - at the ripe old age of 10 months! - which completely made me forget to post my Friday Favorites. So, here they are.
1. Zulily I am pretty sure I will be stalking this website in the next few weeks to find matching Christmas dresses for the divas.
2. DLTK's sites. I love their variety of activities and themes. They also have a link to free, printable tracer pages that can be customized.
That's it for tonight. Hubby wants some cuddle time on the couch! :)
Friday, November 23, 2012
Tuesday, November 20, 2012
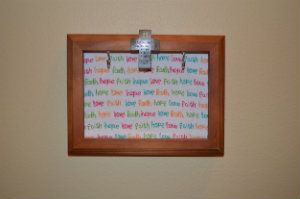
DIY Key Rack
I got this idea off Pinterest and used some items I had on-hand. It was an impromptu weekend project, so it was great that I had the materials I needed to complete it. It made me feel very justified about hanging on to random objects in hopes of converting them into something useful someday. Heh.

The key racks I saw on Pinterest did not have a fabric background, but I decided to include a fabric background on mine to prevent the keys from scraping up the paint/wall.
Materials needed:
Wooden photo frame
Fabric of your choice (optional for background)
Tea Cup Hooks - 2
Embellishments
Tea Cup Hooks: Screw one hook approximately 1 inch from the inside top edge of the frame on each side.
Fabric background: It's a bit blurry, but the words on the fabric read "faith hope love". It was scrap material left over from a nursing blanket I made for the younger diva when she was born. I cut the fabric to the size of the frame using the frame backing that I removed and discarded. I used a hot glue gun to attach the fabric to the frame.
Embellishments: I had a cross refrigerator magnet that I decided to repurpose for the key rack. It has the following verse on it - "But as for me and my house, we will serve the Lord" Joshua 24:15
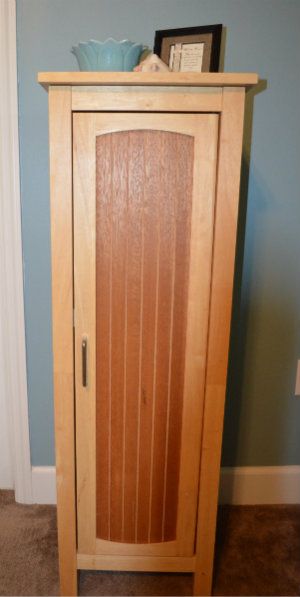
Upcycled Jewelry Armoire
When I moved earlier this year, my sister asked me if I wanted a wood bar cabinet that she was no longer using. I gladly agreed to take it off her hands, but wasn't quite sure how I was going to use it at the time.
Just before my older diva turned 2, she discovered my jewelry box and immediately became enamored of all the shiny baubles it housed. Fun for her, not so fun for me as I had to pick up all my costume jewelry off my bedroom floor...several times a day.
After the billionth time picking up the jewelry, the idea suddenly hit me to convert the bar cabinet into a jewelry armoire! My brother-in-law had installed a magnetic child-proof lock on it to keep my nephews out of the cabinet when they were toddlers. Now, I could house all my costume jewelry and keep diva girl out!
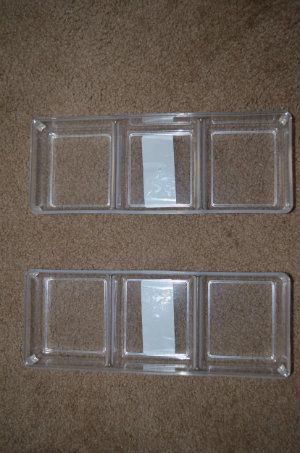
The cabinet is tall and narrow, so it was perfect. I bought a ring/earring tray and two bracelet trays from Target, along with some tea cup hooks.
Sidenote: They had bracelet trays that matched the ring/earring tray I bought, but the cabinet was too narrow to use them, so I had to go with the plastic ones instead.
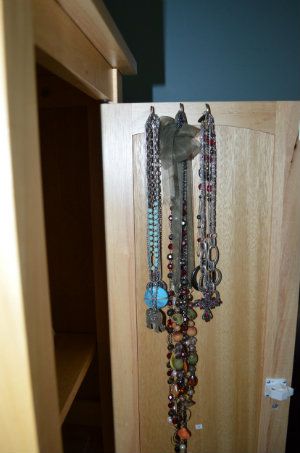
I screwed the tea cup hooks into the inside of the door to hang my necklaces and ~voila!~ I was the proud owner of a jewelry armoire!


Just before my older diva turned 2, she discovered my jewelry box and immediately became enamored of all the shiny baubles it housed. Fun for her, not so fun for me as I had to pick up all my costume jewelry off my bedroom floor...several times a day.
After the billionth time picking up the jewelry, the idea suddenly hit me to convert the bar cabinet into a jewelry armoire! My brother-in-law had installed a magnetic child-proof lock on it to keep my nephews out of the cabinet when they were toddlers. Now, I could house all my costume jewelry and keep diva girl out!
The cabinet is tall and narrow, so it was perfect. I bought a ring/earring tray and two bracelet trays from Target, along with some tea cup hooks.
Sidenote: They had bracelet trays that matched the ring/earring tray I bought, but the cabinet was too narrow to use them, so I had to go with the plastic ones instead.
I screwed the tea cup hooks into the inside of the door to hang my necklaces and ~voila!~ I was the proud owner of a jewelry armoire!
Ring/Earring Tray
Bracelet Trays
Tea Cup Hooks for necklaces
Friday, November 16, 2012
Favorite Things Friday
TGIF, y'all! I am going to use Fridays to post a few of my favorite things. Expect these posts to be sort of random, with no logical connection between the items I post. haha! I don't always have the time to post individual topics about things, so this will be a good way for me to make "collections" of stuff I love. Feel free to leave a comment if you have questions about any of the favorites I share! :)
Favorite #1 - Cheerful Cherubs Boutique. Check out her Facebook page - she has great stuff!
Favorite #2 - My key rack. I got the idea off Pinterest and, of course, personalized it! :)
Favorite #3 - My jewelry armoire. (It's an upcycled bar cabinet.)
I will post tutorials for the key rack and the jewelry armoir this weekend. Photobucket was not being very cooperative this afternoon.
Have a great weekend and God bless!
Wednesday, November 14, 2012
Curried Chicken Stew
My house smells a-MAY-zing right now, thanks to a batch of curried chicken stew in my crockpot! I discovered this dish earlier this year and rotate it through my meal plan about every 2-3 months or so. It is definitely a favorite cold weather dish, but it's not like we get a lot of cold weather days, so I will even make it in the middle of our hot, humid Florida summer!

Curried Chicken Stew
4-6 bone-in chicken thighs
2 tsp olive oil
6 carrots, cut into 2-inch chunks
1 medium sweet onion, cut into wedges
1 C. unsweetened coconut milk
1/4 C. curry paste (mild or hot, to your taste)
Optional add-ins: chopped pistachios, golden raisins, cilantro, and/or crushed red pepper (I use the golden raisins)
Using the olive oil, brown the chicken thighs in a frying pan skin side down for about 8 minutes or until golden brown.
Layer carrots and onions in crockpot. Whisk together coconut milk and curry paste. Pour over carrots and onions, then top mixture with the chicken thighs.
Cook on high for 3 1/2 to 4 hours or low for 7-8 hours.
Top servings with add-ins of your choice.
Tuesday, November 13, 2012
Chocolate chip cookie ice cream cake
The younger mancub celebrated his 8th birthday yesterday. He requested a chocolate chip cookie ice cream cake that our local grocery store sells in their bakery. Of course, when I went to buy one, they didn't have any available. Determined to fufill his request, I decided to make one myself. :)
I know it doesn't seem possible that a self-proclaimed foodie doesn't own any springform pans, but they haven't made their way into my cupboards yet. This baking project would be way simpler with two or three of them on-hand. They've been added to my Christmas wish list. ;) For this project, I used disposable pizza pans.
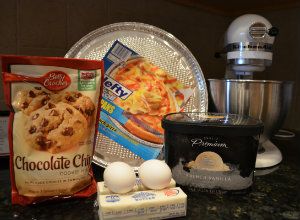
The ingredients - there are only 4 of them!

Chocolate chip cookie dough mix (2 pouches)
2 sticks of butter, softened
2 eggs
Ice cream (I used vanilla, but chocolate would be tasty, too!) - allow it to sit on the counter for about 10 minutes to make it easier to spread.
Sidenote: Don't forget to clip the box tops and save them for your kiddo's school!
Follow the instructions for the cookie dough mix. I doubled the batch in one bowl and just divided it in half to bake the cookie cakes.
Using springform pans
If you are using springform pans, this is where it will get easy. You will need to adjust this process based on how many pans you have.
For the cookie cakes, simply spread the dough in the pan and bake according to the package. Once the cookie cakes have cooled to room temperature, you can remove them from the springform pans.
Refrigerate the cookie cakes, so they are firm and won't break when you assemble the cake.
For the ice cream filling, fill one pan with the desired amount of ice cream. (I used about half of a 1/2 gallon container for my cake). You might want to line the pan with plastic wrap first, to make it easier to separate from the bottom of the pan. Place it in the freezer for at least 4 hours.
Using disposable pizza pans
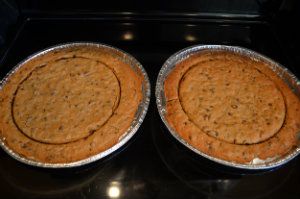
If you are using disposable pizza pans, then spread 1/2 the dough out on each pan, leaving about a 1 inch space from the edge of the pan. This will let the cookie expand as it bakes. Bake until the cookie turns a nice golden brown. I ended up cooking mine for about 12 minutes, so your baking time may vary.
Once the cookies have cooled to room temperature, you can remove them from the pizza pans. First, you will need to resize them to the size you want the finished cake. I used a 9-inch baking round. Just flip it over and press firmly, rotating slightly to make sure you cut all the way through the cookie.

Refrigerate the cookie cakes, so they are firm and won't break when you assemble the cake.
For the ice cream filling, fill the 9-inch baking round with the desired amount of ice cream. (I used about half of a 1/2 gallon container for my cake). You might want to line the pan with plastic wrap first, to make it easier to separate from the bottom of the pan. Place it in the freezer for at least 4 hours.
Once the ice cream is firm, you are ready to assemble the cake!
Assembling the cake
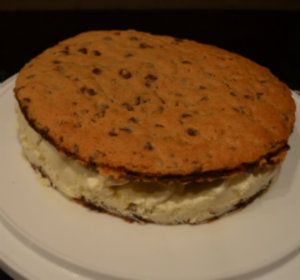
Place one cookie cake on the cake plate. Place the ice cream on top. Top with the second cookie cake. You will need to work quickly so the ice cream doesn't melt.
Once the cake is assembled, place it in the freezer for about 10 minutes to allow the ice cream to firm back up. Then you are ready to serve the cake.
The cake!

Enjoy!
I know it doesn't seem possible that a self-proclaimed foodie doesn't own any springform pans, but they haven't made their way into my cupboards yet. This baking project would be way simpler with two or three of them on-hand. They've been added to my Christmas wish list. ;) For this project, I used disposable pizza pans.
The ingredients - there are only 4 of them!
Chocolate chip cookie dough mix (2 pouches)
2 sticks of butter, softened
2 eggs
Ice cream (I used vanilla, but chocolate would be tasty, too!) - allow it to sit on the counter for about 10 minutes to make it easier to spread.
Sidenote: Don't forget to clip the box tops and save them for your kiddo's school!
Follow the instructions for the cookie dough mix. I doubled the batch in one bowl and just divided it in half to bake the cookie cakes.
Using springform pans
If you are using springform pans, this is where it will get easy. You will need to adjust this process based on how many pans you have.
For the cookie cakes, simply spread the dough in the pan and bake according to the package. Once the cookie cakes have cooled to room temperature, you can remove them from the springform pans.
Refrigerate the cookie cakes, so they are firm and won't break when you assemble the cake.
For the ice cream filling, fill one pan with the desired amount of ice cream. (I used about half of a 1/2 gallon container for my cake). You might want to line the pan with plastic wrap first, to make it easier to separate from the bottom of the pan. Place it in the freezer for at least 4 hours.
Using disposable pizza pans
If you are using disposable pizza pans, then spread 1/2 the dough out on each pan, leaving about a 1 inch space from the edge of the pan. This will let the cookie expand as it bakes. Bake until the cookie turns a nice golden brown. I ended up cooking mine for about 12 minutes, so your baking time may vary.
Once the cookies have cooled to room temperature, you can remove them from the pizza pans. First, you will need to resize them to the size you want the finished cake. I used a 9-inch baking round. Just flip it over and press firmly, rotating slightly to make sure you cut all the way through the cookie.
Refrigerate the cookie cakes, so they are firm and won't break when you assemble the cake.
For the ice cream filling, fill the 9-inch baking round with the desired amount of ice cream. (I used about half of a 1/2 gallon container for my cake). You might want to line the pan with plastic wrap first, to make it easier to separate from the bottom of the pan. Place it in the freezer for at least 4 hours.
Once the ice cream is firm, you are ready to assemble the cake!
Assembling the cake
Place one cookie cake on the cake plate. Place the ice cream on top. Top with the second cookie cake. You will need to work quickly so the ice cream doesn't melt.
Once the cake is assembled, place it in the freezer for about 10 minutes to allow the ice cream to firm back up. Then you are ready to serve the cake.
The cake!
Enjoy!
Monday, November 12, 2012
Follow me on Pinterest
Here is a link to my Pinterest boards for anyone interested in following me. Enjoy! :)
https://pinterest.com/vali_grl/
https://pinterest.com/vali_grl/
Thanks for checking out my blog!
Welcome to my blog!
I am an avid Pinterest user and have to admit some blog envy when I view the blogs that others have linked to for various craft projects, recipes, or home deco/DIY tutorials. I have finally given in and created my own blog. I won't pretend that my projects will resemble any of theirs. In fact, I will probably be more of a collection of various "Pinterest fail" posts than anything else! But, I take comfort in the fact that I am not the only one who probably feels slightly inferior when I compare my end results to those of the domestic genius ranks. So, I invite you to follow my humble blog as I share my random musings with a variety of topics and tutorials of my own. If nothing else, you can learn from my mistakes! ;)
I am an avid Pinterest user and have to admit some blog envy when I view the blogs that others have linked to for various craft projects, recipes, or home deco/DIY tutorials. I have finally given in and created my own blog. I won't pretend that my projects will resemble any of theirs. In fact, I will probably be more of a collection of various "Pinterest fail" posts than anything else! But, I take comfort in the fact that I am not the only one who probably feels slightly inferior when I compare my end results to those of the domestic genius ranks. So, I invite you to follow my humble blog as I share my random musings with a variety of topics and tutorials of my own. If nothing else, you can learn from my mistakes! ;)
Subscribe to:
Comments (Atom)